

We've already shown you fun and easy ways to save on makeup,
but did you know you can create your own nail polish color out of eye
shadow? It's true! When you don't want to splurge on a new polish, just
break out your old shadows (if they’re cracked or broken, that's even
better! Colored pigments work too) and repurpose for your fingertips.
You can mix colors to achieve the exact shade you want—perfect when
creating complex, intricate designs or effects.
Plus, you know no one else in the world will be wearing your
one-of-a-kind color. But the best part? The process takes less than 10
minutes! Keep reading as we walk you through this simple DIY project.
Try it at home and tweet us your pictures!
WHAT YOU'LL NEED
-
1 eye shadow (mineral is preferred because of its finer pigment texture)
-
1 clear nail polish
-
1 small mixing bowl (a disposable paper cup works too)

Step 1
PREP EYE SHADOW
Start by gently tapping a loose eye shadow into a small bowl. If you
are using a solid shadow, scrape it out of the palette using a kitchen
knife. Because you want your polish to apply smoothly without bumps, use
your knife to smash any larger pigment bits into dust. You should have
about a spoonful of powder, which will be enough for all 10 digits. For
an exact measurement, tap eye shadow into a spoon before dumping it into
the bowl.
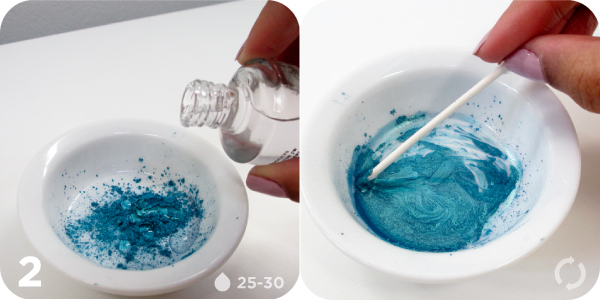
Step 2
MIX IN CLEAR NAIL POLISH
Use the brush on your clear nail polish (we opted for a base and
topcoat combo) to add 25 to 30 drops to the bowl with the eye shadow. If
you are feeling more confident, pour drops directly from the bottle.
Remove the cotton from one end of a Q-tip and use the stick to stir eye
shadow and nail polish together until they blend into a colored liquid
form. You should be able to tell if your polish is too thick or too thin
and adjust accordingly by adding more powder or more clear polish to
the mix. Be sure to blend well. The smoother the formula, the better it
will apply to your nails.

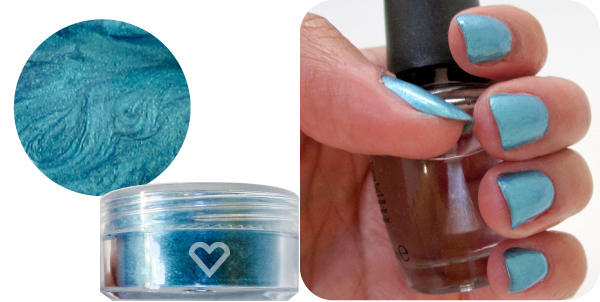
Step 3
PAINT
Because the blend is exposed to air, it will dry quickly, so begin to
paint your nails right away. Use the brush from your clear nail polish
to apply. Don't worry—you can soak the brush in nail polish remover
later to remove the polish (it will be as good as new!). Like a
high-lacquered finish? Apply a clear topcoat to your manicure. Voilà!
Custom holographic nail color.
Picture & Info Via http://www.beautylish.com
What A Great Idea...
this is a genius idea, wow i love this color
ReplyDeleteThis is amazing, I have to give this a try :)
ReplyDeleteThank you for sharing <3
I've done this and love it! I actually just took the shadow and emptied into an ELF clear polish! The shadows from CS's 88 palettes work really well for this!
ReplyDeletewow this such a fantastic idea! thanks for sharing, have a few pigments which are just lying around unused! Would def love to give this a go!
ReplyDeleteLove Aysh xoxo
ive never made my own nail polish! thats a great idea thanks
ReplyDelete